
Update: While not really a "mod" per se, over time I've discovered the best way to slow the Champ down on final for short field, high AOA, dancing touch downs. This update outlines how.
With all of the Z8RC fixes and techniques listed below, you can raise the botched Champ 15e to an excellent and rewarding flier, let's keep it at B+. Without them, the plane is a surprisingly solid F as sold.
With all of the Z8RC fixes and techniques listed below, you can raise the botched Champ 15e to an excellent and rewarding flier, let's keep it at B+. Without them, the plane is a surprisingly solid F as sold.
 |
| Fully deployed spoilerons |
After playing with flaperons extensively, which actually work "Ok" considering the potential tip stall issues with the Champ's abnormally long, low aspect ratio wing, I discovered that spoilerons are much more useful. When flaperons are deployed, the Champ pitches forward like any traditional aircraft during flap deployment, requiring a healthy dose of up-elevator trim. Not very convenient, and a wing-dropping handful at the very slow speeds they enable.
As it turns out, the opposite, pitch-up moment when spoilerons are deployed (deflecting both ailerons up) simply eliminates the need to re-trim the airplane as you slow from cruise to approach speed. Now that's easy. Addtitionally, spoilerons significantly improve the low speed handling of E-Flite's adverse yaw machine. An unexpected benefit is the natural increase in AOA, allowing the aircraft to slow way down and very casually at that.
The image above shows how much total deflection to use. Simply deploy half spoilerons on base leg, and slowly blend full spoilerons once established on final. The Champ 15e has never landed so easy and so well controlled, touching down at a brisk taxi speed on three points.
Original article follows:
I have good news and bad news. Initially this was going to be a full flight review of E-Flight Aeronca Champ 15e. Unfortunately, E-Flight's design team has done such a bad job there is no point in continuing along those lines. This continues my long string of disappointments with Horizon Hobby products, which, quite simply, generally suck. Horizon's "rip off the customer as painfully as possible" business philosophy is the bad news.
The good news is that their sweat shop in China did a very respectable job assembling a plane that they copied reasonably faithfully from the aircraft plans. So although the E-Flight "engineers" (translation: toy makers) didn't understand the power system trade space or how the plane should be balanced, the basic airframe came back usable from China (hardware excluded).
 |
| E-Flight's Champ 15e with MAS 11x4 S2. The vintage prop nut is not included. The black ball joint attaching the wing strut to landing gear anchor is a jury rig to replace a fragile plastic ring that broke as a result of looking at it funny. The hardware pack is complex and good looking, but functionally inept. Mini-Me looks surprisingly proportional. |
A great photographer once told me, in his field, the measure of hopeless incompetence was the inability to make a beautiful woman look good. By similar measure, E-flight's inability to make the timeless classic Aeronca Champ fly beautifully, is sufficient grounds to conclude they are hopelessly incompetent.
So I'm going to go straight retitling this article to the more important topic, "Fixing the E-Fight Aeronca Champ 15e." I will leave the original article, as far as I got before calling it off, quoted below.
So let's get right to the list of the flaws discovered in two days of ownership:
E-Flight Quality Failures:
- The right main's metal screw tab cracked off on a slight bounce, collapsing the landing gear.
- The spring loaded tail wheel provided no directional control whatsoever upon rolling over a 5mm pebble; plunking the nose into a curb, and resulting in a 1" crack between the left main gear wood fuse anchor points.
- Upon replacing the tail wheel springs with thin piano wire, the tail wheel directional set screw's head twisted off under rather light torque.
- The right aileron control horn, permanently embedded in the wood, cracked off from the tiny amount of leverage applied by sliding the control rod out of the servo horn, generating 5-10 degrees of angle.
- The wings strut broke at the main gear anchor when attempting to rotate it at design rotation point, to tighten a nut before inserting the wing attach bolts.
- A secondary wing strut broke at the screw tab, under the stress of lifting the plane up by the wing root.
- The cowling was painted the wrong shade of yellow (several shades too dark) and had to be repainted and glossed.
- The cosmetic downpipes exiting the bottom of the cowling departed in flight.
- The supplied aileron control rods were to thin to screw into the supplied nylon clevises; different thread sizes.
- The main landing gear center attach point screw broke upon tightening.
- The elevator control rod casing was inserted at an insufficient angle to prevent excessive binding; both rods had to be bent to align with the elevator control horn.
- The front canopy goes has a Monokote glare-shield behind it instead of a painted front cabin, sitting in the hot sun creates non-repairable wrinkles .
E-Flight Design Failures:
- The recommended power system is more than double the weight for proper balance.
- Related to (1) - Induced drag is over-the-top, coupled with a excessively heavy and power-hungry Power 15 motor recommendation, results in a far too heavy battery capacity recommendation.
- The plane severely misbehaves as a stall develops.
- Adverse yaw is excessive.
- The thrust line is way off.
- The CG is set improperly. The plane is extremely nose heavy. Unattributable to a simple misprint, as the balance point is on the main wing spar.
- Glide performance is destroyed by (1, 2, 5, and 6). Since any conventional airfoils' glide range is unaffected by weight pre-stall, the Champ as wrongly designed still glides a long way. The difference is glide airspeed and landing speed, which are both way too high. Further, unless you immediately fight the Champ's strong tendency to beeline for dirt, airspeed will rise above L/D)max and glide range will subsequently decrease due to a marked increase in parasite drag.
Z8RC Quality Fixes:
- Replace lower gear strut attach screws with longer ones, so about 1/8th inch sticks out, front and back. Use the extra screw length as an anchor to tie off 5 or six winds of thin solid core copper wire. I used the yellow wire from inside a composite phone cord. Dab with epoxy.
- Replace springs with straight,thin piano wire. It is pull pull so there is no need to overdo the the wire gauge.
- Use extreme care when tighten E-flight poor quality fasteners. I f break the control head screw, wrap both sides of the the tail wheel control head in thin, stripped, solid core copper wire then tin with hot solder. This will attach the top and bottom brackets without welding the hinge point, and strengthen Horizon Hobby's rip off quality hardware.
- Use extreme care not to stress this cheap plastic part. If broken dab with a small dot of Gorilla Glue or epoxy. Once dry, reshape and re-drill the control horn hole.
- Saw off the wing strut ends where they meet the fuse, drill a pilot hole in lengthwise, and screw in servo ball heads to act as properly mobile an attachment anchor. See first picture, above.
- Dab each secondary structure attach point with a small drop of expoxy.
- Use Testors Model Master "Signal Yellow" then an acrylic gloss. Perfect match.
- Dab with epoxy.
- Replace supplied rods and use aftermarket ball links to avoid play in the control surfaces.
- Use higher quality hardened steel crews or extreme caution.
- After inserting the elevator Y pushrod, grab the rod about 1 inch after it exits the tail with medium pliers, use a second pliers to bend until it aligns with the control horn. Use caution to allow enough unbent rod to move in and out of the fuse hole as the elevator servo functions.
- Score through the Monokote covering along the inside-cabin, bottom edge of the front canopy, remove covering to expose balsa. Paint flat black to avoid glare in the pilot's eyes.
 |
| Fixing E-flight's cheap landing gear hardware. This shot also illustrates a few minor craftsmanship issues with the covering. The outside wear on the tires is evidence that E-Flight's strut tension is intended for a much heavier airplane (and all the pathetic flying qualities that come with excessive weight). |
Z8RC Design Fixes:
- Replace E-Flight's overweight Power 15 recommendation with a lightweight, high thrust-to-weight ratio .10 motor like the Super Tigre .10 or Rimfire .10. Use a 30A ESC and 11 inch low pitch prop - 11x4, 5, or 6.
- A 1500 mAh 3S mated to a Super Tigre .10 will give 10-15 minutes of mixed aerobatic flying time. Use a 1200-1300 mAh for 10-15 minutes of pure cruise. 2100 mAh for 20-25 minutes of flying time. Use E-flight far too heavy recommendation, 3200 mAh, for up to 40 minutes of flying time. With the lighter motor in the nose on a parallel connector (which I always install for battery redundancy, I've hauled 2 x 2100 without issue, but you are back to E-Flights poor handling, power system weight.
- The lighter power system is a 100% fix. You can also lengthen both aileron push rods for about 1/16th inch upward deflection on both wings when neutral. This slight spoileron increases the built-in washout.
- Mix 25% pro rudder with aileron movement (AIL>RUD). You can also use differential ailerons which make them travel up more than down, theoretically increasing the drag on the downgoing (lower lift) wing, but I've found that rather ineffective with the Champ's wing geometry. The ailerons aren't overly effective anyway, and so I'd hate to sacrifice any of the full possible lift differential by limiting range of movement before a hard stop is hit. But if you find a differential throw helpful, there are two ways to do it, by computer radio, or by geometry. The geometric method requires that the servo arms be installed at an angle when the ailerons are in the neutral position (adjust pushrod length appropriately). Both servo arms should be angled forward when the ailerons are flush, since the Champ's aileron servos are bottom-wing mounted.

For geometric differential ailerons, both servo arms should angle
forward (for a bottom wing mount) when the ailerons are flush
with the wing. This angle pushes the aileron up more than it
pulls it down. Note that E-Flight's servo cover opening really
doesn't allow enough range of travel to induce more than a
slight aileron differential without modification. You may
also need to install the servo in a slightly different place
than the manual's recommended center point. - Here is the proper thrust line.

Orientation: The ".10" is at the top. Two #4 nuts on top left (pilot perspective)
mount, one #4 nut on bottom left, one #4 washer on bottom right,
one #4 nut and two #4 washers on top right mount
Use 1 inch #4 standoffs for a perfect Super Tigre .10 fit.
Toto has it right
If you use the E-flight mount unmodified, as recommended in the instruction manual, yaw from motor torque is extreme at full power. This is in part due to the Champ's short moment arm to the vertical stabilizer. Later model Champs were modified with a much larger vertical fin to counter increasingly powerful engine options.
Hobbyzone's 22" Champ's Thrustline - spot on - The lighter motor is a 100% fix.
- Same as 5.


...so it is important to get the thrust line right (Design Fix 5, above) to keep your Champ from entering low earth orbit under strong power.
The original, aborted article follows:
There are two kinds of people in the world:
- People who agree the Hobbyzone Champ is the best RC trainer ever built
- People who've never flown it
 |
I premixed 10% pro rudder with aileron without even flight testing first. Will likely need more. I replaced E-Flight'sfishing line tail box rigging with thin carbon fiber rods for strength and simplicity. What were they thinking? Flying off grass would tear the tail apart, as designed. |
- Flight Characteristics: C-
- Stall Characteristics: D
- Factory Workmanship: B+
- Air frame Design: C+
- Quality/Engineering: F
- Overall: F
I had lied to the man, in order to buy the model. This landing was hardly a pancake, a slight bounce; the gear failure totally surprised me:
Let's count the criminally negligent Horizon Hobby quality blunders apparent from the first two days of coddled use:
- The right main tab cracked off on a slight bounce, collapsing the landing gear.
- The spring loaded tail wheel provided no directional control whatsoever upon rolling over a 5mm pebble; plunking the nose into a curb, and resulting in a 1" crack between the left main gear wood fuse anchor points.
- Upon replacing the tail wheel springs with thin piano wire, the tail wheel directional set screw's head twisted off under rather light torque.
- The right aileron control horn, permanently embedded in the wood, cracked off from the tiny amount of leverage applied by sliding the control rod out of the servo horn, maybe 5 degrees of angle.
- The wings strut broke at the main gear anchor when attempting to rotate it at design rotation point, to tighten a nut before inserting the wing attach bolts.
- A secondary wing strut broke at the screw tab, under the stress of lifting the plane up by the wing root.
- The cowling was painted the wrong shade of yellow (several shades too dark) and had to be repainted and glossed.
- The cosmetic downpipes exiting the bottom of the cowling departed in flight.
- The supplied aileron control rods were to thin to screw into the supplied nylon clevises; different thread sizes.
- The main landing gear center attach point screw broke upon tightening.
- The elevator control rod casing was inserted at an insufficient angle to prevent excessive binding; both rods had to be bent to align with the elevator control horn.
 |
| As big as the model is, interior space is very cramped. |
 |
| The rib cutout behind the leading edge makes wiring wingtip LEDs easy. I have since re-worked the engine mount with the proper four 1 inch thin aluminum spacers, instead of the heavier stock 1/4 inch plus 3/4 inch composite standoff shown here. The 12x6 MAS K-series prop is a screamer. |
 |
| Craftsmanship in the tail area left something to be desired. |
 |
| I didn't realize the wing tube was aluminum until the step to tap it for the wing holding screws, otherwise I would have substituted a carbon rod. |
 |
| A wing section X-ray showing the high quality woodwork. The control horn ball joint hardware is my own, E-Flight needs to go back to school when it comes to hardware selection/design. The kit hardware from struts to control horns is extremely fragile and overly complicated. I was warned about this at my LHS and was very careful to predrill and coddle everything; I still had two catastrophic failures--a broken strut (took about 2 oz of force to break) and a snapped embedded control horn (PITA to fix). I wound up replacing almost all of the flight control hardware. |
 |
| The plane turned out on the lights side, mostly due to the twin motors exceptional thrust to weight ratio. The suspension shocks are overly strong as a result. I had to repaint and gloss the cowling to match the covering (use Testors "Signal Yellow"). The factory cowl was several shades too dark. |
 |
| Interior construction is well executed, but the outside of the complex curves of the tail section (inside shown here) looks a little rough on the covering job. As you can see, the designers failed to embed the stringers into the formers. This results in a weaker airframe, and fails to firewall potential tears in the covering, but it results in a very clean look when the covering is drum tight. |
 |
| The Champ looks great with wingtip Nav lights, a yellow position light under the tail, and a high intensity directional spot light for a landing light located inside the canopy at the left wing root. |
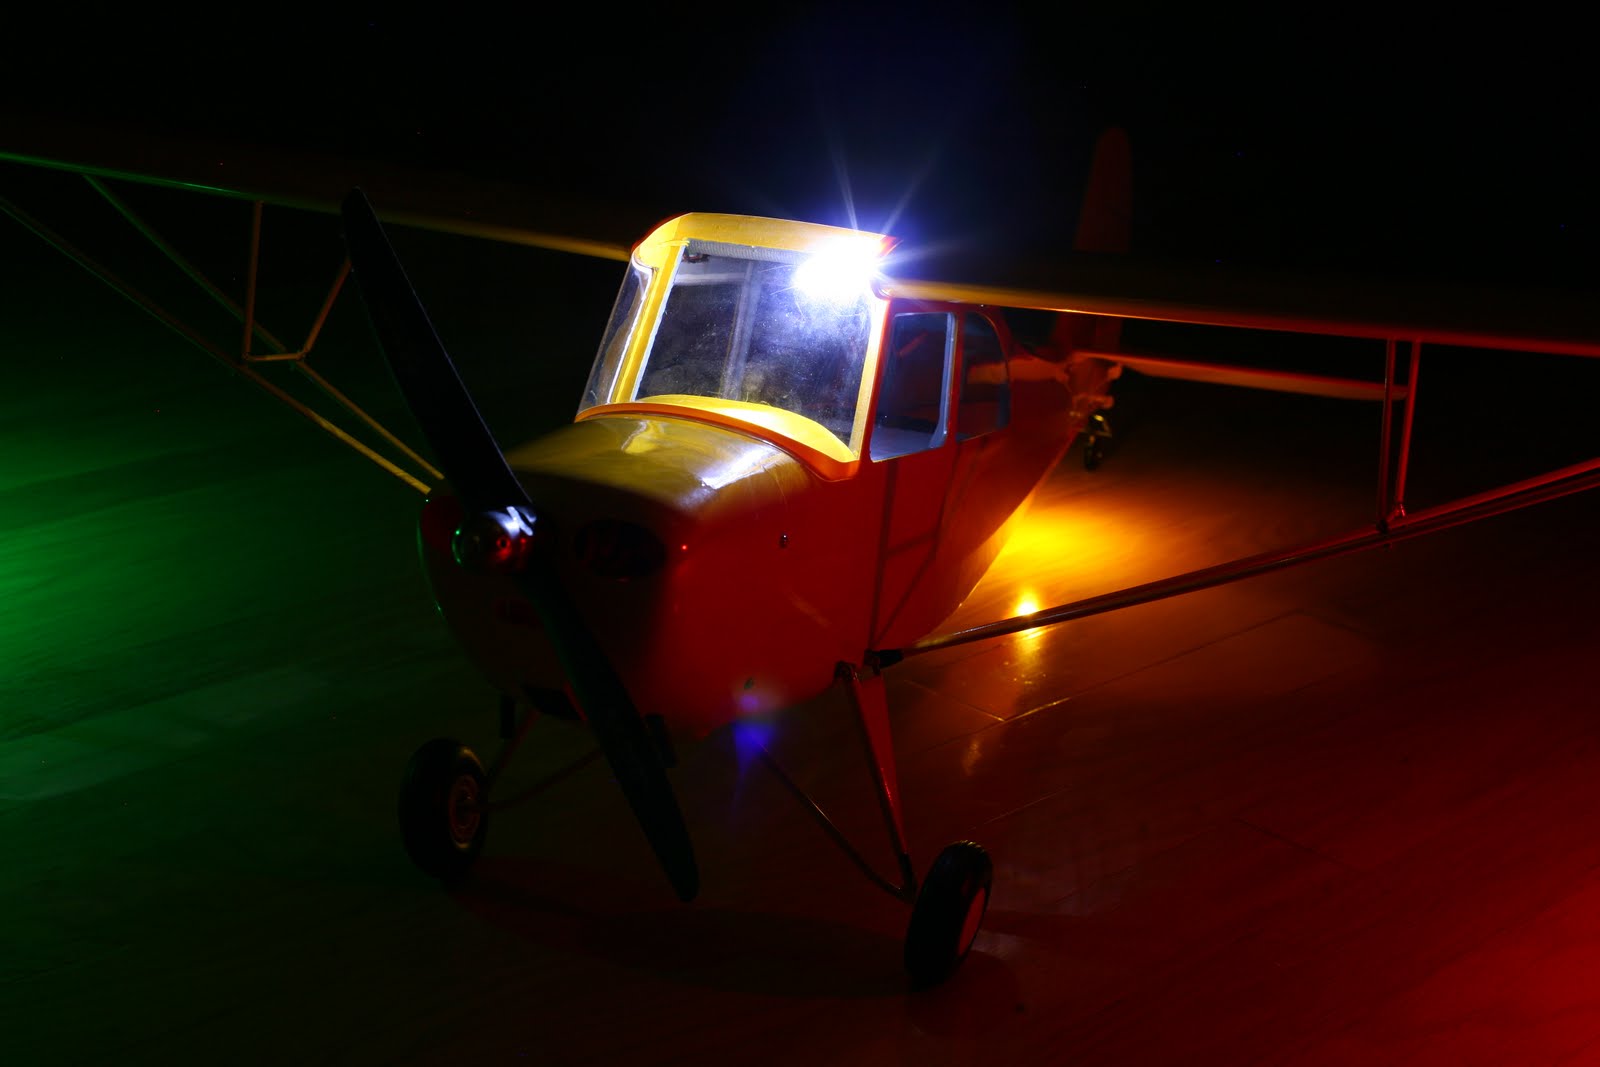 |
| The high intensity spot LED make a perfect landing light, as well as illuminate the cockpit at night. |


