
Update - March 16, 2011: New #7 fix in yellow.
The AT Yak 54 is a great flying airplane. Even better, it's cheap. Even worse, it's cheap. These fixes are aimed at fixing the bad part about being cheap. In order to preserve the good part, I've tried to keep the fixes simple and cheap, too.
Flight test confirms that these fixes make the Yak 54 an absolutely stellar flier! The new 2:1 Thrust-to-Weight ratio, outstanding wing rigidity and lighter flying weight brings handling to the A+ level. I couldn't be happier with this airplane, it is making a serious run for "all time favorite." In fact, as an advanced flyer, it is definitely my favorite airplane, but you have to stay on top of it which removes some of the Sunday relaxation factor. I'll have to think some more about giving it the official title.
 |
| The little Yak is fun, it probably has no idea what its parents went through. |
1) The geared motor has plenty of torque, but lacks the umph to accelerate hard, and fails to provide a large margin of error that is desirable in a smaller scale 3D model.
2) The plane is stuck in first gear. 1st gear isn't a bad place for a slow speed 3D model, but a more powerful motor can provide even better performance across a wide airspeed envelop.
3) It is loud.
4) The foam wing is very flexible, making precise maneuvers inconsistent and more difficult.
4) The foam wing is very flexible, making precise maneuvers inconsistent and more difficult.
5) The wing cradle fits loosely, compounding the problems of #4.
6) The foam dents easily.
6) The foam dents easily.
7) (Disregard: this turned out to be a Spektrum DX8 quality defect) The servos and linkages are not secure, introducing slop. The aileron control arm is under the most pressure and tends to slip on the servo head.
8) The landing gear is weak and way too bouncy, including the tail wheel.
9) The spinner is for show and doesn't stay on.
1, 2, & 3) I upgraded to my favorite brushless motor, the $24 Super Tigre .10. The ST .10 is a great 3D motor as it has a radically higher motor power:weight ratio than any other motor in it's class. The price is right, too. The ST .10 and suggested mounting hardware weighs 0.6 ounces less than the stock motor, gearbox, and mount.
Installing the new motor int he Yak is super simple:
Installing the new motor int he Yak is super simple:
- Remove the four screws holding the old motor/gearbox to the firewall (the old motor is soldered to the A-T 20A ESC--bummer--you'll need to snip then re-solder the motor leads or add connectors, or change out the ESC depending on how many Amps you want).
- Center the ST .10's aluminum X bracket mount on the Yak's firewall and mark the 4 mounting screw holes.
- Drill four 1/8" holes all the way through the front and rear plastic firewall.
- Buy four, 3" long, 1/8" diameter metal bolts, 8 matching washers, and 12 nuts. If your hardware store doesn't stock the bolts separately, look for them in the wall anchor section.
- Looking at the front face of the motor:
- Insert the bolts through the aluminum X mount bracket, so you can see the head of the bolt from the front of the airplane.
- Put 2 nuts on each bolt, on the back side of the X mount bracket. Keep them loose for now.
- Put a washer on each bolt after the 2 nuts.
- Screw the bolts into the 1/8" holes in the firewall. Screw each one in a little at time. To gauge the final motor position: the base of your chosen prop adapter (or the back face of the prop) should be about 3.5" in front of the firewall. Don't worry about the exact motor position, as this method will keep it adjustable even after the plane is fully assembled.
- Once the motor spacing is correct, and all evened up for a straight thrust line, put a washer and nut on the back firewall. Use a small spot of Guerrilla Glue or some other all purpose glue to adhere the nuts/washers to the firewall (but don't glue them to the bolt). Tighten up the back nuts.
- After applying a similar dab of glue to the firewall,washer, and the first nut on the bolt section between the firewall and motor, tighten up that first nut against the washer and front firewall. Because of the 8 washers against the firewall, these 8 nuts (4 on the backside of the firewall and four on the front side) should be tightened down until the plastic flexes a little. When these 8 nuts/washers are done and the glue is dry, you will essentially have a threaded firewall for the four bolts to anchor into. Since the nuts are glued to the firewall, and the double-plastic firewall provides a lot of friction against the bolts turning, the thrust line will remain adjustable from the front face of the engine by turning the bolt heads individually.
- Tighten the 4 remaining nuts against the back of the X mount. Again, use a dab of glue to adhere them to the X mount, but not to the bolts.
- You now have a mounted motor with a field-adjustable thrust line.

5) Embed a carbon fiber slat (weighs 0.25 grams) in the foam underwing. Cut a shallow slot with a new exacto blade, widen using the end of the slat itself as a knife. Gently tap into slot with a hammer, using a foam sheet underlay to protect the top of the wing. Secure with foam safe thin CA glue. Tape over with scotch tape.
6) Wrap clear mailing tape around the leading edge. This also stiffens the wing slightly.
7) (Disregard: this turned out to be a Spektrum DX8 quality defect) Remove servo control arms. Add a tiny drop of epoxy to the inside of control arm where it attaches to the servo (careful not to use too much, or it might squeeze out and into the servo gears). Update: I changed to a metal gear servo for aileron control, using the same control arm. Roll rate in the air doubled, and it was already very fast with full throw. The new full throw roll rate is best described as "a blur," indicating that the stock servo was under a lot of stress, and as such, certainly not as precise as it should be. While adjusting the pushrod lengths to calibrate the new servo, I noticed that the stock setup's servo + push rod length induced a little camber into the wing via mild flaperons. Taking the flaperon out to create a perfectly symmetrical wing/aileron setup now allows inverted level flight with exactly neutral stick.
8) Add another piece of piano wire to reinforce the gear. Rewire the tail wheel using slightly thicker piano wire.
9) The Parkzone Fw-190 spinner works well, or add a solid aluminum prop nut if you desire a the same CG. The ST .10 and mount is about 0.5 oz is lighter than the stock motor and mount.
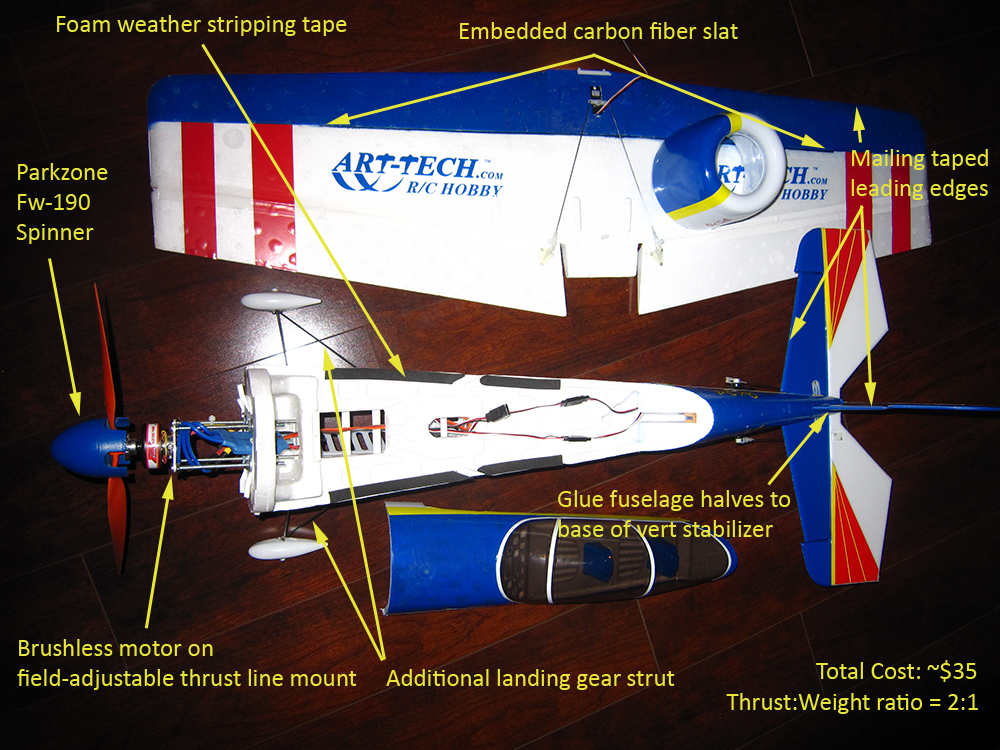
Result: Lighter plane with a 2:1 Thrust-to-Weight ratio.


