Coming Soon... Blade MCX conversion to a 20" wingspan, gyro-stabilized Wright Flyer.

Sunday, October 31, 2010

Saturday, October 23, 2010
Fixing Flyzone's Select Scale Super Cub
Updated in yellow.
A flurry of Super Cub's have hit the market, it's an embarrassment of riches. Flyzone's entry, their Select Scale Super Cub is one of the best looking Cubs on the shelf, and it comes in a PNP and RTF version. How much more could one ask?

Well.... a lot, as it turns out.
This Cub looks so good and is so reasonably priced, I guess something had to give. Flyzone has managed to embed all sorts of nasty vices in a simple Cub, and that's really hard to do. They must have people who specialize in complicating the handling of simple planes. I know, I know, every review of this plane is 100% raves. Well, the plane isn't a great flier; it actually flies rather poorly in stock form. Those websites only want to take your money to pump their paid sponsors; time for a dose of reality:

The good news is that Flyzone's numerous mis-steps are, for the most part, fixable. It is a basic Cub underneath, after all. Here how to fix Flyzone's list of mistakes:
First, a list of the largest flaws:


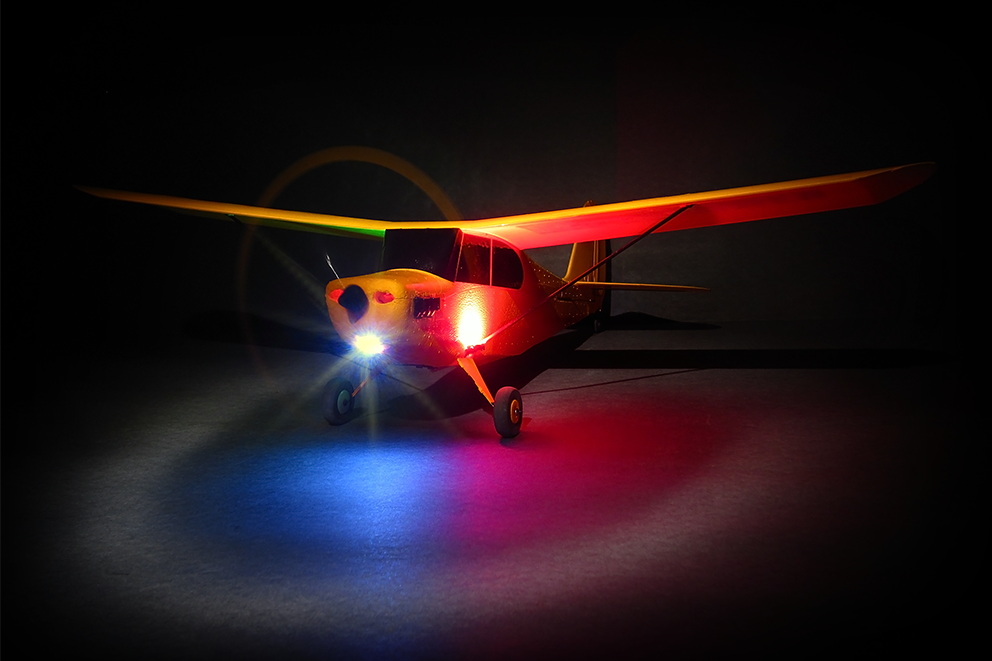
The Cub is easy to retrofit with ultra-bright Radio Shack 4-pin square LEDs. These LEDs operate on 2.3V to 5V. They are almost too bright to view comfortably at night with one LED wired in series for each Lipo battery cell, and they run hot enough to harden the Cub's "aerocell" foam after a few minutes of stationary use, so consider running 4 in series (12.6V/4 = 3.15V; falling to about 2.5V per LED when the battery is empty).
My Super Cub (shown) has 6 LEDs, 3 wired in series on each side of the plane (the colored Navigation Lights are double-LEDs). The Nav Lights face inward, toward the fuselage, lighting the Cub up like a billboard at night, and reducing the blinding effect when the plane is viewed from the side. You can see the LED on/off micro toggle (also Radio Shack) in the photo, above.

Z8RC's rating for Flyzone's Select Scale Super Cub: B-. Great looks, good price, no power (easily fixable +$20), aerodynamic design incompetence (mostly fixable). I hope to get this plane to an A- flyer with the listed fixes--I still have to finish up some testing.


Well.... a lot, as it turns out.
This Cub looks so good and is so reasonably priced, I guess something had to give. Flyzone has managed to embed all sorts of nasty vices in a simple Cub, and that's really hard to do. They must have people who specialize in complicating the handling of simple planes. I know, I know, every review of this plane is 100% raves. Well, the plane isn't a great flier; it actually flies rather poorly in stock form. Those websites only want to take your money to pump their paid sponsors; time for a dose of reality:
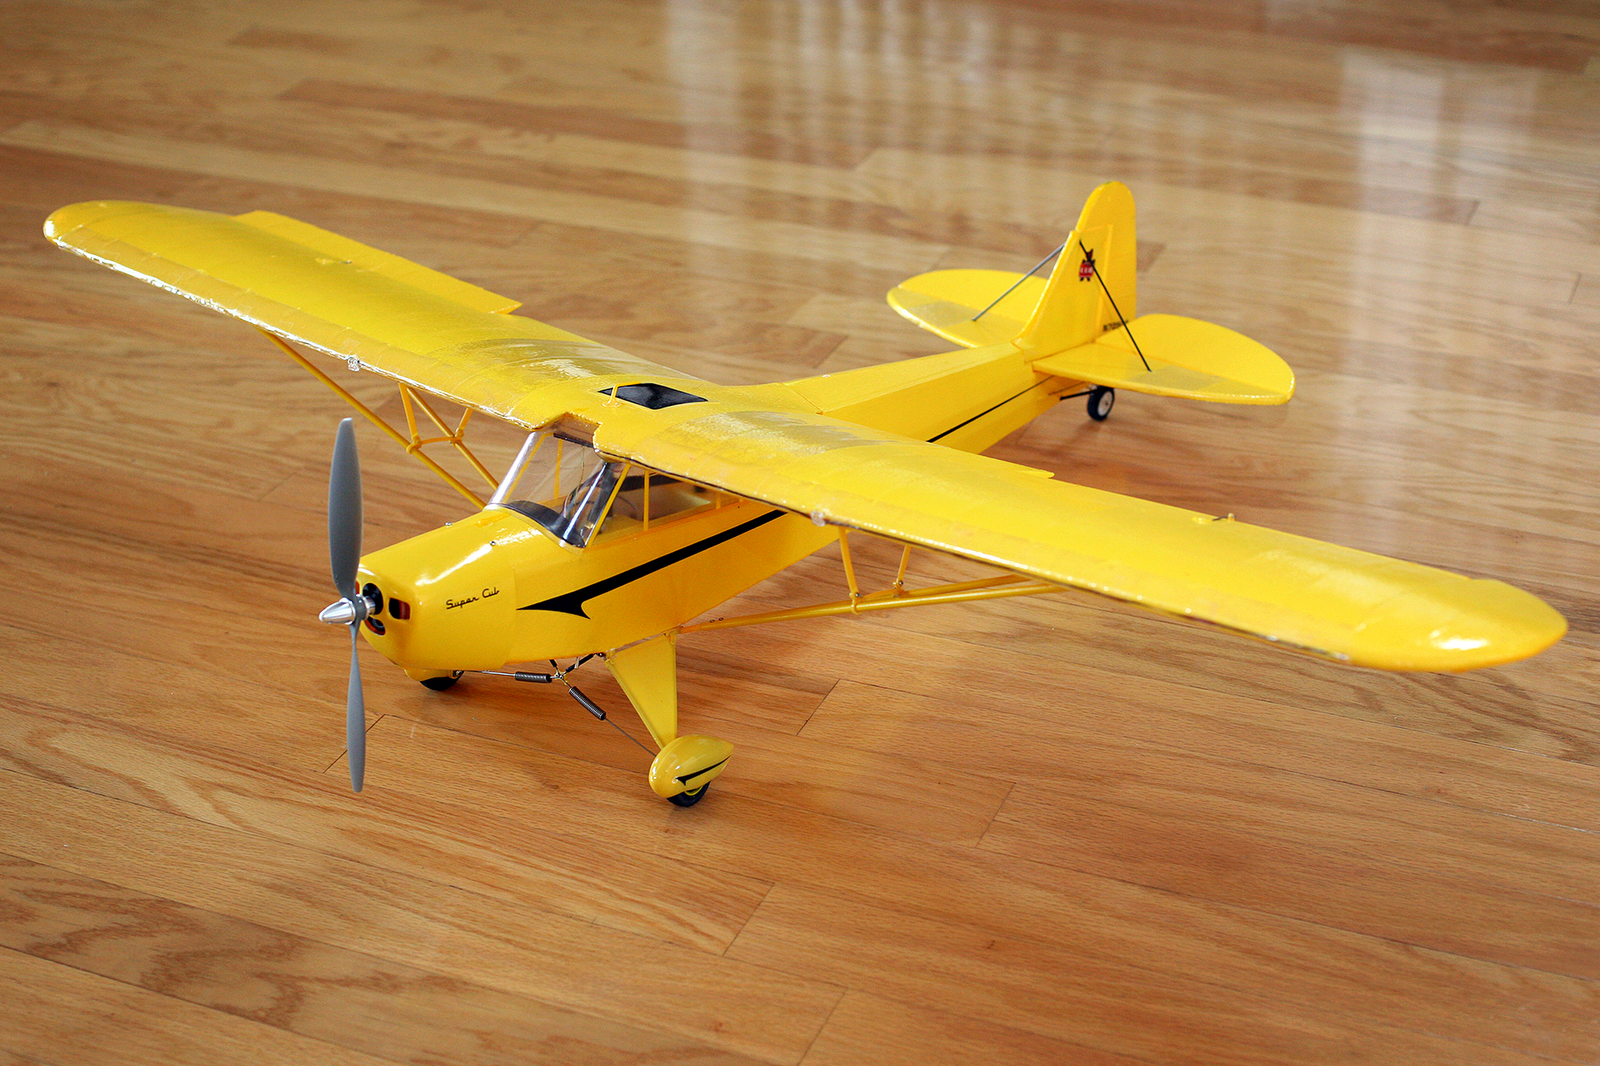
Photo shows various upgrades and fixes, including:
motor/prop upgrade, LED mod w/wiring in the wing leading
edge and landing lights visable, gear and empennage bracing,
edge and landing lights visable, gear and empennage bracing,
and increased Dihedral. I use clear mailing tape for strength
on all leading edges and to create "handles" at the wing root
on all leading edges and to create "handles" at the wing root
to avoid dirtying the foam over time.
The good news is that Flyzone's numerous mis-steps are, for the most part, fixable. It is a basic Cub underneath, after all. Here how to fix Flyzone's list of mistakes:
First, a list of the largest flaws:
- There is essentially no dihedral. Perhaps this is true to scale, but the scale Cub is designed to be strong and cheap, first and foremost. There is no reason to duplicate a straight wing in an RC trainer, when you can have massively improved handling by sneaking in a little wing angle--unless--your engineers don't understand basic aerodynamic trades, and Flyzone's clearly do not. There is slight negative stability, meaning, if you set the Cub out of level, it will slowly increase, not decrease both pitch and roll until it hits the ground. This holds true through out the entire flight envelope. That's crazy--for a Cub.
- There is not enough geometric or aerodynamic washout, impairing slow flight handling. See #8 for a related vice.
- Empennage construction is too weak; the alignment of the horizontal stabilizer "floats" in flight, inducing slight, unpredictable roll with solid pitch changes.
- The Cub's wingspan is too wide for it's length, and/or, the size of the vertical stabilizer is ineffective. Adverse yaw is excessive.
- There is erroneous reverse-differential aileron movement baked into the internal hardware mechanism, exacerbating the adverse yaw problem.
- The gear suspension is excellent in function, but the top spring wires are too weak to handle a medium bounce.
- The Cub is significantly underpowered with a full battery charge, and becomes severely underpowered at half battery life. The plane struggles to get over-the-top with a fresh battery, falling off to one side unless the entry is down-hill. Takeoff is tricky unless your extended runway center-line is free of obstacles.
- Traffic pattern stall tenancy is to snap into a tight, 90 degree nose-low, rapid spin. The worst full stall handling I've ever seen.
- The paint is inconsistent in color. The cowling is a non-matching pale yellow, while the ailerons are a the warmest yellow on the plane and they don't match the wing color. The fuselage changes color from nose to tail.
- The standard wing fit is loose, possibly adding to some of the Cub's squirrelly yaw behavior in the air.

- Insert a nut between the metal wing strut and wing surface to increase dihedral. The increased static stress on the strut seems reasonable, and will likely disappear in the air. I used #4 1/2" wood screws through 1/4" nuts and washers. Do not over-tighten.
- Insert both a nut and a washer between the rear struts and wings.
- Add carbon fiber bracing to the tail section (shown). I penetrated the foam by about 1/8" then anchored with a tiny drop of Gorilla Glue.
- I recently added a clear plastic vertical stabilizer extension in front of the tail wheel, sticking down, F-16 style. I'll provide a picture and flight report if it helps enough.
- Mix approx. 10% rudder in the direction of aileron movement. This will make adverse yaw worse whenever you are flying inverted, but that overall trade is probably worthwhile.
- Add carbon fiber bracing (shown).
- Change to a 9x3.8 prop for a little more pull. Use higher C rate batteries. Switch to a 400 or .10 size motor. The Super Tigre 400 ($20) is a drop-in replacement using the Cub's own plastic mounting bracket. The Super Tigre .10 ($23) also drops in with 1/4 inch tube spacers (since you can't use the included plastic mount adapter) but the bottom two mounts must be zip tied (still a stronger mount than the foam nose that holds it all together). The ST 400 saves weight and adds about 50% more power given a large enough prop diameter to translate it's lower kV into more thrust (like a 9" to 10" diameter slo fly prop). The ST .10 is the same weight as the stock motor and adds about 300% more power. If you keep the cheap, low gauge ESC, make sure you don't pro-up the upgraded motors beyond 18 Amps. The ST .10 only pulls 14 Amps max with a 9x3.8 (compare to 54 Amps with the Bf 109 3-blade) with less than 50% throttle required for spirited flight, and battery life is as good as stock (about 12 minutes from a 1350 mAh 3-cell). With a .10 motor and the small 9x3.8 prop, Thrust-to-Weight ratio is only slightly less than 1:1. To handle the increased thrust without excessive climb and yaw under power use 2 washers under the top right engine mount (model's pilot perspective) to angle the trust vector down, and use 3 washers on the left mount to create a (very) slight right thrust vector. The prop shaft should still fit through the hole in the cowl, barely. See the 1st pic below.
- Fix #2 helps.
- No fix required.
- With the wing removed, add two strips of very thin foam weather stripping to the top of each side of the cabin area, to seal the wing/fuse attachment lines. I also dripped a few drops Gorilla glue down around the base of the small pole that holds the wing mount bracket in place, so its held more securely by the foam around it. 100% fix.


The Cub is easy to retrofit with ultra-bright Radio Shack 4-pin square LEDs. These LEDs operate on 2.3V to 5V. They are almost too bright to view comfortably at night with one LED wired in series for each Lipo battery cell, and they run hot enough to harden the Cub's "aerocell" foam after a few minutes of stationary use, so consider running 4 in series (12.6V/4 = 3.15V; falling to about 2.5V per LED when the battery is empty).
My Super Cub (shown) has 6 LEDs, 3 wired in series on each side of the plane (the colored Navigation Lights are double-LEDs). The Nav Lights face inward, toward the fuselage, lighting the Cub up like a billboard at night, and reducing the blinding effect when the plane is viewed from the side. You can see the LED on/off micro toggle (also Radio Shack) in the photo, above.

Z8RC's rating for Flyzone's Select Scale Super Cub: B-. Great looks, good price, no power (easily fixable +$20), aerodynamic design incompetence (mostly fixable). I hope to get this plane to an A- flyer with the listed fixes--I still have to finish up some testing.
UPDATE: The fixes outlined above bring the FZSSSC to A level handling. Stability is noticably enhanced, and the plane is eager to float effortlessly behind it's 1 oz lighter nose (1 oz saved by the motor, another by removing the factory ballast between the cowl and fuselage side walls). Increased thrust is welcome in all flight regimes, but most helpful is instant activation of the smallish rudder during the takeoff roll, following quickly by very strong climb-out capability.
The Cub's new found dihedral and wash out is especially successful, allowing the plane to finally become docile and agreeable about where you point it. One thing you might notice is a need to increase up-elevator a bit more aggressively as the plane slows near touchdown speed. That is because the wing tips are now at a lower angle of attack than the wing roots, decreasing tip lift, meaning, the stall will now develop at the root first, reducing any tendancy to drop a wing hard. A side effect is less overall lift at any given incidence angle, meaning you might need to raise the nose a bit more as the plane settles into a now more symmetrical stall condition.
I added a clear plastic shark fin under the empennage, in front of the nose wheel to set her even straighter. Great improvement in the willingness to glide-- the Cub takes a few dozen feet (less than before) to chin-up from a TP stall, hands and power off, but once it settles into a glide the nose stays up and the speed peels away until it appears darn near motionless - luv the improvement! Now that's a Super Cub!
(could use one more washer per strut!)
Addendum:
I'm currently using one nut + 1 washer in the front and 2 nuts in the back. Here is a picture of the clear plastic vertical stabilizer extension, it helps a lot but if I had to do it over again I'd make it 2about 20% larger.

Tuesday, October 12, 2010
Quick Take: Great Planes' $89 Fokker Dr.1 Triplane (ARF)
I like to collect classic airplanes, so the gorgeous little Great Planes Electrifly Fokker Dr.1 Tridecker was a natural choice.


Well done, Great Planes, can we have a 40" version?

Great Planes continues to release wonderful ARFs. This kit is no exception. For those used to foam airplanes forming the most popular RTF offerings, you are in for a treat. The Great Planes ARF kits get you in the air in a reasonable amount of time and are in a much higher quality class than relatively junky RTF/ARF foam airplanes. Thankfully the price is low enough to add quality servos and still come out ahead, at at least even with, foam RTF offerings from Parkzone and the like which are sold with junk electronics.
This kit is balsa and ply, roughly 5 times stronger than foam, truer flying, and covered in Monokote with a high gloss finish that doesn't deteriorate with use.

The plane has nice scale details, but for just $79 after Towerhobbies.com (no affiliation) usual discounts, nothing that will knock you over. The Tridecker ships with is a thin plastic scale cowing the snaps in place using pre-installed rare earth magnets, a black radial engine bottom (I painted mine up a little), and two, pre-painted black balsa wood machine guns. The wheels are sturdy and look great on the custom landing gear. The "fouth wing" between the wheels is counted in Great Planes 300 square inch wing area, and 10-12 ounce wing loading calculations.
My model finished up at 24.2 ounces including adding 2 ounces of lead in the nose for balance. (since removed, no need)
I installed a Super Tigre .10 motor with a 10 x 6 hand-balanced Top Flight wooden prop. An 11 x 6 prop is shown, but is a bit power hungry for a 1300 mAh; flight times are only 6.5 minutes and thrust-to-weight is over-the-top. Max thrust on a 1300 mAh 25C with a 10 x 6 is in the 29 ounce range, for about a 1.1 to 1 Thrust to Weight ratio at the Triplane's flying weight. The $20 Super Tigre .10 is the perfect motor for this menacing presence in the sky, if not a bit too strong (is there such a thing?). The motor is both too strong and too light for the plane, a thrilling combination. Thrust is spectacular, as is top speed and agility. Torque roll is an issue when slow, as the Triplane packs it's high aspect ratio 90" wingspan into just 30" on the top wing.

Construction is straight forward, but the plane is not, so it takes some thought to put this baby together. The nose is so stubby you have to be absolutely obsessive about saving weight in the tail section. Each ounce of heft here will mandate about 5 ounces of nose ballast. That's a lot for a 24 ounce model. Be careful. Cram every component you install as far forward as possible, if not under the cowling. I sliced out the plywood battery brace, to shove the battery about half an inch farther into the nose.
Balance is critical in a Tridecker, more so than most airplanes because there is so little nose moment arm. Make certain you balance the model using some sort of jig with a bubble level fixed to the horizontal stabilizer (but don't weigh down the tail). I found the book CG of 2" back from the leading edge, a bit too nose heavy, so I removed about an ounce of the 2 ounces I originally installed for balance. Yay--I really hate weighing down an airplane.
This kit has a reputation for a weak firewall, so I added medium balsa cross bracing behind mine, as well as 0.25" balsa studs butting up along the left and right sides. The end result is strong enough for an even larger motor, and the ST .10 is so light you'll still probably need to add a little ballast up front.
Visual control surface alignment is difficult, as the ailerons extend beyond the wings, and with 3.5 wings, one has to wonder how much twist and alignment error you can comprehend without simply giving it a try. One wing shipped badly twisted--the one between the wheels. A heat gun and some coercing untied about half the warp. With that and a little aileron eyeballing, this WWI villain was ready to take to air.
Take off was easy. The gear is solid, and I installed an ultra-light tail-wheel for control. Once airborne, the initial setup was a handful. The plane wanted to roll hard left, no doubt due to unanticipated non-offsetting errors from all the wings. I pointed the nose toward a 3/4 Moon and ran the trim right. Ahhh, much better.
Once trimmed up, this airplane flies great and looks even better. What fun to see the abnormally tall three wing stack circling in sun-lit crimson. As odd as the Tridecker is, it flies very well and is extremely agile in the air. It has no apparent vices, but the excellent responsiveness and maneuverability need to be tamed with a healthy dose of expo.
My first loop was only slightly ajar upon exit, due to a little cross control from my immature rudder and aileron trim settings. After trimming out the glide, loops became axial. Nose track around turns is tremendous, making the Dr.1 an ultimate single-circle fighter. I was afraid speed would bleed quickly, given the nose rate, but the agile flying wing box never dropped a wing exiting from some uncanny turns.
One can feel the appeal of this age-old classic, you'll get a first hand appreciation for the men who loved piloting this vicious killer.
The 3.5 wing arrangement is almost square when viewed nose or tail-on, which could also be described as a circle (circumscribing the square). This makes for exceptional longitudinal in-stability. This is a great attribute for a fighter, but it is not the most relaxing configuration for sport flying. With a good computer radio (mine bound to a DX8) unwanted roll can be all but exterminated. That is, until, you run out of airspeed. Point the nose skyward, pull the power back to essentially hover, and away she goes, rotating absolutely uncontrollably, opposite prop torque. The Dr.1 is a very interesting combination of supreme roll-ability inherent to the design, while at the same time suffering from a relatively ineffective, top-wing-only aileron design. The rare combination adds up to some of the most outrageous torque roll's you'll see this side of Oshkosh. Luv it!!
Landing? Who needs it. Good thing cause this plane is a little bit of a handful. My first landing was definitely hot, resulting is a well controlled, arcing bounce that quickly morphed into a miniature bouncing PIO. Not too bad, no wing scrape and I rolled away. The roll sensitivity is challenging, but also incredibly fun. Nose authority remains high all the way through the round-out; greasing it on is definitely an option.
Overall, this plane was a great buy, a very strong and equally unique flier. It is certainly not a first or second plane due to the interesting scale handling and the ability to out-maneuver yourself. But for classic scale lovers who want a better appreciation for the great designs of history: I give it a B (Recommended), plus bonus points for some really fun quirks.

Thursday, October 7, 2010

Saturday, October 2, 2010
Quick Take: HobbyZone's 22.5" Champ (with a few mods :)
Three cheers for Hobbyzone's little Aeronca Champion! This1944 vintage, true American classic sold over 10,000 copies, not counting later Citabria and Decathlon variants.


Flying doesn't get any more relaxing than steering this fantastic little floater around your neighborhood. Fly it in a few yards space (as in, lawns) and it coasts past starry-eyed children in slow motion--completely under control with full back stick at 1/2 throttle. Taxiing is easier than most micros, with a true steerable tail wheel and double-wide mains. The included, HobbyZone brand, 150mAh single cell LiPo battery is about 30% longer than my Turnigy 160mAh (AVOID) and it lasts about twice as long.
I'm not going to rave on and on about the Champ,which is the first micro I've seen deliver perfect manners in a small package, but I could. Just buy it and fly it from your driveway! The Champ sells for $90 in RTF form. I wish it was available for around $70 as a BNF, but the beefy foam quality--at least twice as solid as most micros--and dreamy aerodynamics make this puppy a steal even with a low end RTF radio in the box.

For even more stability and long term strength and, most of all, scale looks, on my way to the hobby store checkout counter I picked up a thin carbon fiber rod to add the black wing struts (shown: running from the main rear gear fairing attach point to mid-wing--ok--I shoulda painted them). If you do this strut mod, keep the carbon wires thin so weight stays nice and low, the wing is reasonably strong already. Press the rod 1/16" into the foam and secure each attach point with a small dot of Gorilla Glue or Foam Safe CA.
Hobbyzone Champ, you get an easy: A+!
Addendum: Champ LED Mod
 Great airplanes beg for projects that use some of their excess capacity (sometimes making them not as great, but a whole lot of fun). This LED project is easy to install and costs me $9 out the door. It uses three Radio Shack super-bright 4-pin LEDs for Navigation and Landing Lights, and a red flashing LED as an Anti-Collision Beacon. I used very thin wires from inside an old phone cord (the kind with a plastic connector at each end) to wire it all up. Here are the parts:
Landing and Nav:
http://www.radioshack.com/search/index.jsp?kwCatId=&kw=4-pin%20led&origkw=4-pin%20led&sr=1
Beacon:
http://www.radioshack.com/product/index.jsp?productId=2117837
I tapped the power lines running to the battery connector by melting a little rubber off of each wire, then soldering a new wire to each lead. I wired each LED in parallel, connecting each one to the new wires i added to tap power from the battery. The 4-pin LEDs are extremely bright, make sure they illuminate teh airplane instead of pointing outward horizontally, or they may bother you while flying the plane. i angled the Landing Light down at a 45 degree angle, directly on top of the Champ's radiator mock-up. The white 4-pin LED Landing Light illuminates 3-5 feet in front of the plane for night landings. You may wish to move the red and green Nav Lights out to the wing tips for better spacial definition of the wings at night.
The Champ has plenty of power to lift the lights which only weigh a few grams each, and they look great at night!


Flying doesn't get any more relaxing than steering this fantastic little floater around your neighborhood. Fly it in a few yards space (as in, lawns) and it coasts past starry-eyed children in slow motion--completely under control with full back stick at 1/2 throttle. Taxiing is easier than most micros, with a true steerable tail wheel and double-wide mains. The included, HobbyZone brand, 150mAh single cell LiPo battery is about 30% longer than my Turnigy 160mAh (AVOID) and it lasts about twice as long.
I'm not going to rave on and on about the Champ,which is the first micro I've seen deliver perfect manners in a small package, but I could. Just buy it and fly it from your driveway! The Champ sells for $90 in RTF form. I wish it was available for around $70 as a BNF, but the beefy foam quality--at least twice as solid as most micros--and dreamy aerodynamics make this puppy a steal even with a low end RTF radio in the box.

For even more stability and long term strength and, most of all, scale looks, on my way to the hobby store checkout counter I picked up a thin carbon fiber rod to add the black wing struts (shown: running from the main rear gear fairing attach point to mid-wing--ok--I shoulda painted them). If you do this strut mod, keep the carbon wires thin so weight stays nice and low, the wing is reasonably strong already. Press the rod 1/16" into the foam and secure each attach point with a small dot of Gorilla Glue or Foam Safe CA.
Hobbyzone Champ, you get an easy: A+!
Addendum: Champ LED Mod

Landing and Nav:
http://www.radioshack.com/search/index.jsp?kwCatId=&kw=4-pin%20led&origkw=4-pin%20led&sr=1
Beacon:
http://www.radioshack.com/product/index.jsp?productId=2117837
I tapped the power lines running to the battery connector by melting a little rubber off of each wire, then soldering a new wire to each lead. I wired each LED in parallel, connecting each one to the new wires i added to tap power from the battery. The 4-pin LEDs are extremely bright, make sure they illuminate teh airplane instead of pointing outward horizontally, or they may bother you while flying the plane. i angled the Landing Light down at a 45 degree angle, directly on top of the Champ's radiator mock-up. The white 4-pin LED Landing Light illuminates 3-5 feet in front of the plane for night landings. You may wish to move the red and green Nav Lights out to the wing tips for better spacial definition of the wings at night.
The Champ has plenty of power to lift the lights which only weigh a few grams each, and they look great at night!


Engine Cylinder Mod:
Today I added four cylinder heads, two on each side of the cowling, using the ends of four large nylon zip-ties painted gloss black. I know, I know, its really a Cub thing.

Subscribe to:
Posts (Atom)
Top 10 This Week
-
Update: Also see: Fixing the Flyzone Fokker Dr.1 Micro Update: After all that was discussed below, the little Fokker's motor shaft r...
-
 Z8RC Quick Take Killing time at the airport, I was shocked to see an electric flight Magazine in a small newstand - they never carry RC ma...
 -
In another Lucy and Charlie Brown place kicking moment, a trim button cracked-- AGAIN --in my newest DX6i while my excellent little Durafly ...
-
 The new Ares company has stormed onto the Ultra-Micro scene. Offering apparent competition to Horizon Hobby micros, I've found the new ...
 -
Anyone who’s flown the Blade 103 X will tell you, the tail was botched badly. The vibration problem: Horizon Hobby wanted to use a Z8RC m...
-
 Update: Correction: I found a 3 Ch BNF, though I personally wouldn't trust the Scout Tx at range: http://www.amazon.com/Super-Cub-Tr...
 -
 I've gone to a soft throttle approach with my powerful airplanes. Some helicopter ESCs use a "soft start" to protect the ge...
 -
 Update: While not really a "mod" per se, over time I've discovered the best way to slow the Champ down on final for short fie...
 -
 Update 6/20/12: Rimfire .60 and video . Update 6/4/12: I really enjoy the scale 4-blade prop included with this warbird, and the sound i...
 -
 QUICK TAKE The DX18 is the latest evolution of Spektrum's DSM2/X product line. After researching the level of change delivered by ...


Top 10 This Month
-
 Walking out of an arts and crafts store, I couldn't resist this simple 50" Air Hog foam glider, sold in a bag for $6. http://www....
 -
 UPDATE: After pretty light use, the E-Flite 370 in the Ascent failed without warning between two flights. It landed fine, only to never r...
 -
Update: Also see: Fixing the Flyzone Fokker Dr.1 Micro Update: After all that was discussed below, the little Fokker's motor shaft r...
-
 INTRODUCTION It is sooo past time for a Jug. SPECS - Wingspan: 1400mm (55.1 inch) - Length: 1250mm (49.2 inch) - Flying Weight: 2100g (...
 -
 Update: The Z8RC design mods bring the mCPX to A+ . Without them, the mCP X grade stands at F . Winds have pushed me inside. This fl...
 -
Anyone who’s flown the Blade 103 X will tell you, the tail was botched badly. The vibration problem: Horizon Hobby wanted to use a Z8RC m...
-
 Update: My Fw-190 review now contains 4S trials and prop data, pulling it on top of the Spitfire for the comparison below. The stock Fw-19...
 -
 Update: After several more trips tot he field, I am upping the Mosquito's overall grade to A . Update: Added a discussion of slow flig...
 -
I've gone to a soft throttle approach with my powerful airplanes. Some helicopter ESCs use a "soft start" to protect the ge...
-
 I've written about this subject before, but this diagram should help clarify how easy it is to add your own LED lighting for just a few ...